Monday, September 25, 2017

Dorm...done! Oregon State Weatherford Hall Dorm Room!

It's officially been a week since we moved our oldest daughter into Weatherford Hall at Oregon State...my how time flies! I just wanted to show you how the dorm room came together after my last post about organizing for the big move.  I'm really happy to report that all that preparation paid off in the end, and the helpers at OSU made it extra smooth.  They met us at the curb in front of the dorm just as we opened the trunk, and while our girl was checking-in and getting her room key, hoards of young men appeared to carry it all upstairs.  What a blessing!  Of course, we did have to park our cars once they were unloaded and walk a ways but that's okay.

Here are some photos of the unpacking process and the finished product!  (Just a side note, the housing department didn't want to de-loft the two beds in the room but we insisted.  Yes, it's a tight squeeze, and you can't open the wardrobe while sitting at the desk, but it's what the girls wanted and it works!)


Desk Area


Weatherford Dorm Room

Friday, September 15, 2017

The calm before the...DORM!

I feel a little funny posting this before moving my daughter to Oregon State this Sunday, but it may reach a mom or two in a similar situation who also have the dorm move-in ahead of them.  And, of course, I'll update you on whether or not my ideas worked as I hope they will!  We all know, a picture is worth a thousand words...so, I'll start with one.


The calm before the...DORM!
Looking at the picture above, select the best answer:  A. You know I'm not expecting company in my guest room. Or, B. Organizing makes me feel more in control.  Ha! The answer is of course, C. All of the above.  

I know some of you may have been putting off the gathering of items your young adult needs for college (notice I didn't say "child," even though I wanted to), because it makes it all too real that she/he is leaving home.  But, the amount of things they need to make their tiny rooms feel like home for the next year take a lot of time to find at a reasonable price and in the style they want.  So, my first tip...start early!  We literally starting picking things up off our list after graduation in June (which I have attached for your printing pleasure!) Spreading it out over the whole summer makes the cost easier to swallow and allows you to avoid the last minute feeling of panic we all get when we're unorganized for an important event.  

Side note...We started with the general color scheme of course, which was decided by my daughter and her roommate.  They decided to get matching white comforter sets, but wanted to show their individual style through artwork and throw pillows.  Speaking of pillows, now they can get expensive! But, they make the bed look so much more inviting when there's a generous pile of them.  So, again, shop early.  Every time we were somewhere like HomeGoods, JoAnn or Marshall's, we would check out the pillow section. We scored some great clearance deals this way, and I know they're going to have that great "collected" look when laid on her bed. 

Back to organizing!  When you've got a lot of puffy things, like the afore mentioned pillows, you're going to want space saver bags.  Luckily, Dollar Tree has them because the real Space Bags are spend-y.  Granted, they only come in one size at Dollar Tree, but I was able to fit all her towels/hand towels/washcloths in one so they're not that small.  Another one was used for her set of sheets.  Another for her blanket. Her regular bed pillows got the vacuum treatment as well. Anyway, you get the idea.  They're a great space saver, and I was then able to easily stack the plastic blocks they became into large Ikea shopping bags (Only .99¢ each!) for portability.  I used these same bags to also gather together practical items like a fan, mini-vacuum, and a lap desk for studying in bed.  They're a great size, so I recommend picking up a bunch (this is an unpaid endorsement!)

A couple of the other organizing ideas we stole from our Pinterest surfing.  Like leaving the clothes on the hangers, and using garbage bags as garment bags.  We took it one step further by numbering the bags so that when she removes the bags her clothes will be organized by type and color.  A little obsessive, probably, but if she can start college with a little feeling of order and control it can't be bad! The two exceptions to this method were her jeans/yoga pants which we folded and stashed in her hamper, and her coats/dresses which were put in traditional garment bags because of their bulk.  After bagging and labeling her clothes, we folded them in half and stacked them into some more of the Ikea shopping bags.  I must say, I like these better for clothes than plastic bins because we can fold them down and store them in her dorm for the move-out next June and they have long handles we can swing over our shoulders for carrying.

Speaking of plastic bins, yes, we did use them.  We dedicated one bin for each area of her dorm room.  One for bath/toiletries, one for kitchen/snack type items, and one for school/desk supplies.  As we purchased items over the summer we could just toss it in the appropriate bin.  And, bonus, this way when we unpack the items everything is in one place and easy to find.

Another idea we picked-up from the web was to pack small drawer units ahead of time, and just tape the drawers shut. We can then simply slide them under the bed, remove the tape, and she's ready to go!  A narrow set of drawers holds undies, bras, and socks.  The wider set, t-shirts, sweatshirts and pajamas.  We also opted to purchase the opaque drawers for little extra for privacy, and the cute basketweave pattern. We just used a little craft glue to paint the handles gold to match all her other gold accessories.

Lastly, we packed a small bag (pictured on the bed) with cleaning supplies (Clorox Wipes & Swiffer Set) and commonly used tools, like screwdrivers and duct tape.  We wanted to be prepared for the unknown, and it just seemed practical.  Why would we move all her beautiful new things onto dusty old furniture? We wouldn't, so we can give everything the quick wipe down before unpacking!

Phew! That's it for now...I better go start loading this mass of things now just to make sure it fits in the ol' Ford.  I'll be sure to post a few pictures of the finished dorm room, because I swear there are like two pictures of Oregon State dorm rooms on the entire web.  Oh! And, here's the pretty little packing list I compiled from a bunch of others I'd seen.  Hope it comes in handy and gives you a little sense of calm in the storm of dorm move-in day with your daughter!  (Btw, it doesn't include clothes, 'cause honestly what girl would forget those!!)
Page One
Page Two

Page 3

Page 4

Page 5

Page 6

Page 7


Quick & Easy Dorm Decor Ideas!

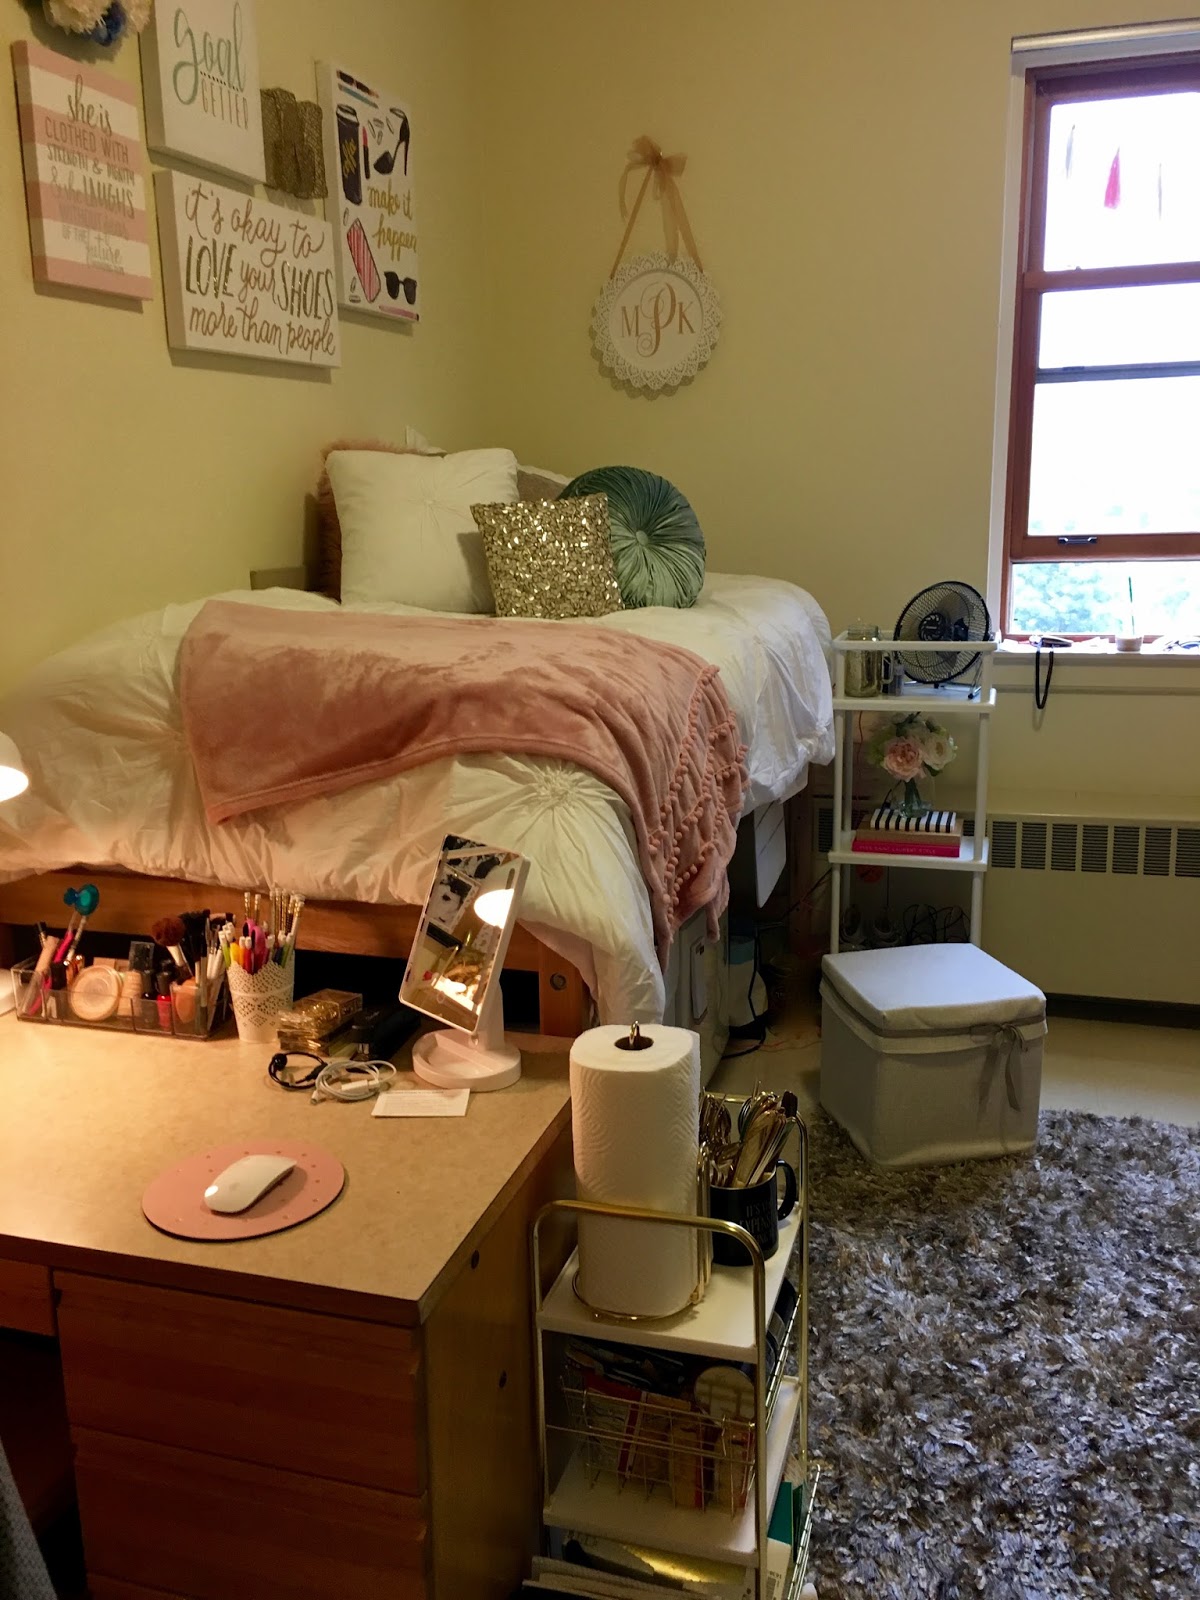
Hey there! I know it's been a couple months since my last post, but the summer just flew by between vacations and college prep.  You might have guessed since my last posts in June were about high school graduation, I'll now be moving on to a couple posts on dorm room decor and organization. But, I've also got a couple more ideas for party planning and dance team mom duties that I'll sprinkle in as well.  Anyway, as I look at the giant pile of things to move to Oregon State, I must say my oldest daughter and I might have had a little too much fun with all the preparation, because now we have to find a way to fit it all into the cars we're taking!  So, before I start shoving it all into said cars I thought I'd share two quick and easy dorm decor ideas...which happen to be really inexpensive, too!

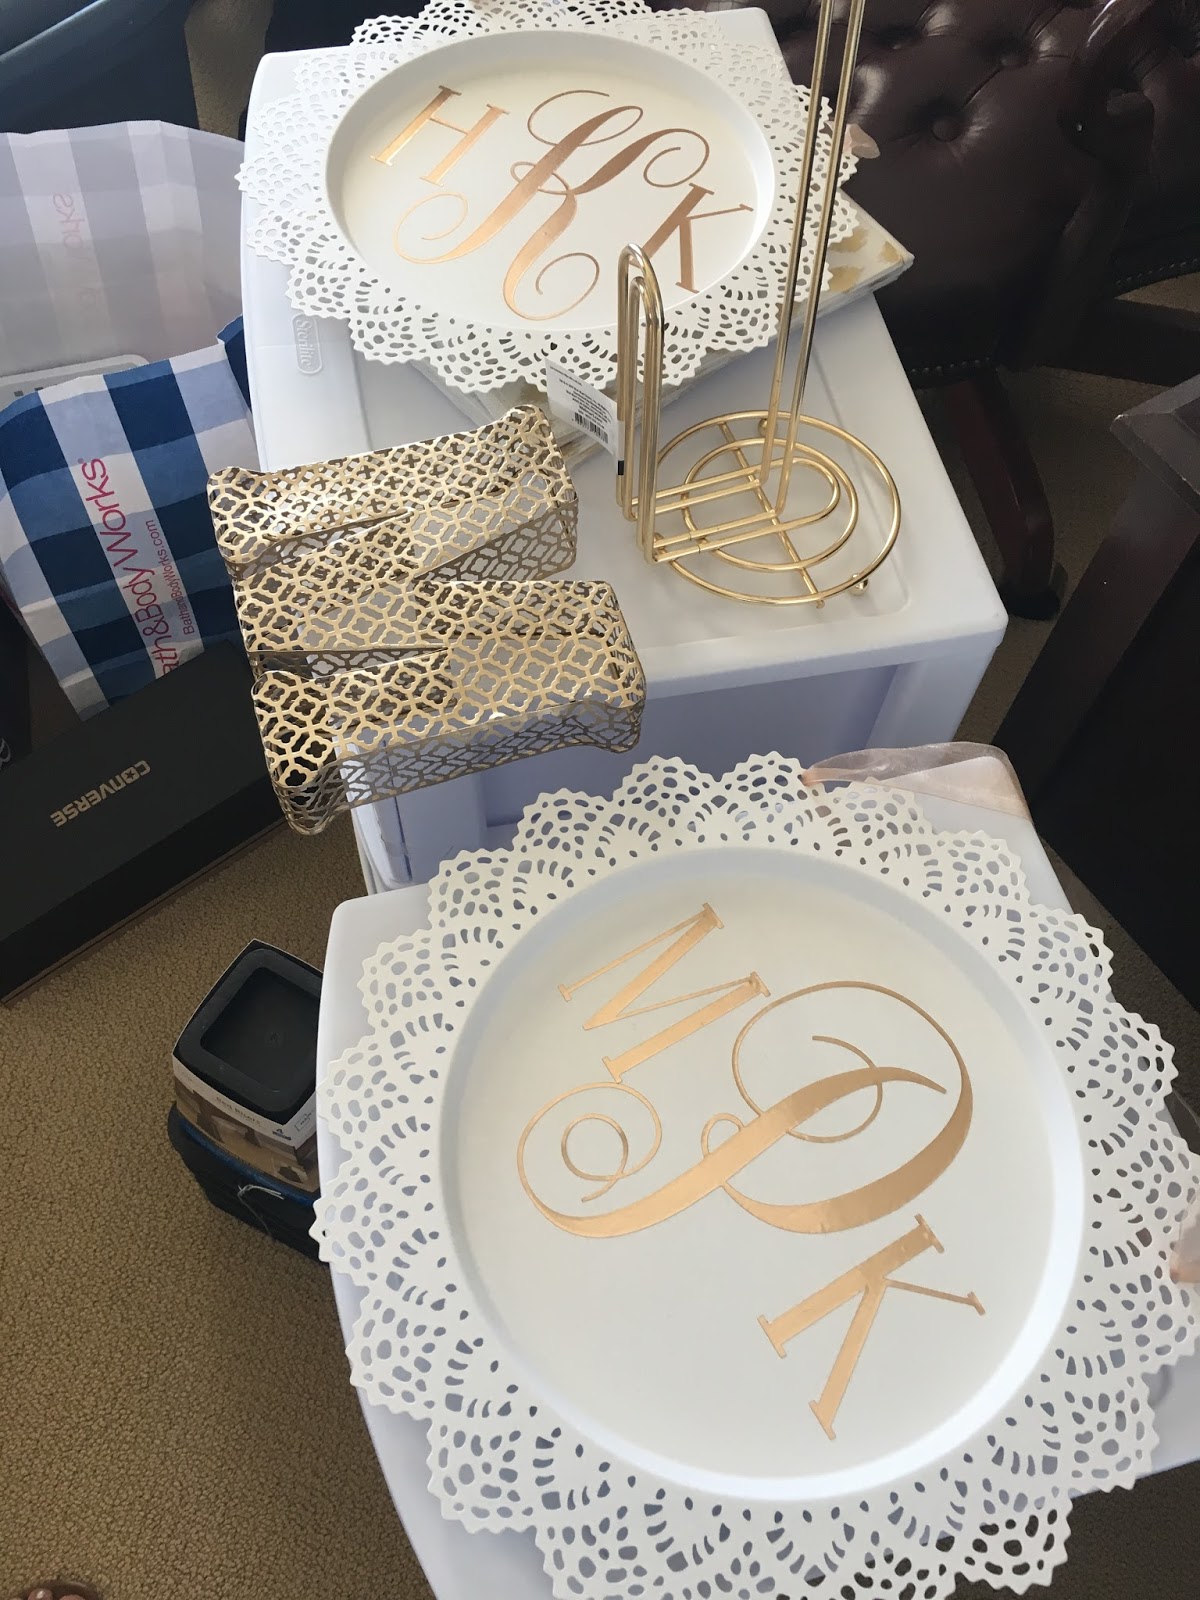
First, on a recent trip to our local Ikea we found this cute little candle plate/dish above (find it here: http://www.ikea.com/us/en/catalog/products/80239979/) for only $4.99.  It was too cute to pass up since my daughter and her roommate went for a pastel, feminine vibe for their dorm decor.  Of course, we had to switch it up a bit and use it in an unexpected way.  We decided to use it as a wall hanging for above the head of their beds and affix their monograms to it using Cricut metallic vinyl.  For those of you who don't own a cutting machine... get one now! Or, you could of course just order a monogram sticker from someone on Etsy.  Here's the finished product, which we added a little gold ribbon hanger to.  It's also nice that the plates aren't too heavy, because they will be hung by a Command Hook in the dorm. And, as we all know...you can't poke holes in dorm walls!


Ikea Hack...Candle Plate turned Wall Hanging!

The second project idea is a floral wreath.  Nothing ground breaking about this one, but it turned out really pretty and will be the perfect finishing touch for her gallery wall above the side of her bed.  The extra nice part, it was really inexpensive to make as compared to buying one pre-made and we could customize the colors to match the canvas' that it will be hung with.  So after a quick trip to JoAnn's where we scored a large bunch of 5 silk peonies for only $2.50 (end-of-summer sale), and then to Dollar Tree for the rest of the flowers and the foam wreath form we wrapped up this project for only $6.50 (minus the hot glue, which I already own)! 

 Here's some tips for success: 
  1. Beware of ugly. I'm sorry, but some of the silk flowers at Dollar Tree look like they cost $1. So, choose wisely to keep it classy and soft looking.  We grabbed the pink peonies, and hydrangeas in two colors that are delicately colored and simple.
  2. Use five large blooms to ground your wreath in a pleasing symmetry; varying their angles to keep it natural looking.
  3. Use an awl or similar tool to pre-poke the holes into the styrofoam wreath where the flowers will go to avoid breaking the plastic stems.
  4. Pull the flower heads and leaves off the thick plastic stems, and cradle the leaves at the base of the flowers to frame them.
  5. Use hot glue in the pre-poked holes before placing the flowers in them to ensure a secure hold.
  6. Start with the large blooms, then fill in the spaces between with the smaller flowers. Don't go in a strict pattern or it will look funny, spreading out the colors more naturally will give you a better effect in the end.
Without further ado, here's our pretty little wreath...can't wait to see it up on the wall in Weatherford Hall!  Move-in is this Sunday!