Friday, December 23, 2016

Super Easy 4-Ingredient Christmas Cookies!

Since it's Christmas Eve-Eve, I've been baking today and I thought I'd share a shockingly easy, but oh-so-delicious, recipe I've been making since I was in grade school.  Brown Sugar Shortbread.  How can only four ingredients taste this delicious, you might ask? Well, they can and do.  I've gifted them by the dozen to my extended family for my the bulk of my life, and they are usually gone before they go home!  Naturally, it's the perfect simple recipe to make with small children (especially since there's no egg in the dough they can sneak a pinch without worry).  They are certainly some of my two daughter's favorites and they look forward to them every year.  
Here's the original recipe card from my childhood, complete with my unusual spelling of cookie.  Take time to make some memories in the kitchen this Christmas with this recipe, and I can guarantee you won't regret it! Cheers!

It doesn't get any simpler than this! 4-ingredients to buttery, sweet goodness.

Mix ingredients until the dough pulls away from the sides of the mixing bowl. Firm consistency.
Roll into 1" balls, then dredge in granulated sugar. Close-up of the
cookie press I've had all my life...but the bottom of a glass would work too.
Dip stamp in sugar between presses to avoid sticking.


Cookies ready for baking!
Finished cookies...ahh, the smell of melted butter and brown sugar...nothing better!


Saturday, December 10, 2016

Dollar Store Garland Upcycle...Christmas Bell Ornaments

Post two for today...yes, it's still raining.  It's the time of year for the team holiday party, and I wanted to make the girls on my daughters' dance team some cute bell ornaments...they are the "Belles," after all!  But, if you've ever shopped for Christmas ornaments (who hasn't!), you know they can add up fast.  So, off I went to my local Dollar Tree to see what they had in the way of bells.  What to my wondering eyes did appear,  but a gold bell garland so my choice was clear...am I taking this holiday thing a bit far?  

Okay, so with 10 bells per garland, I grabbed two and got to work.  I measured equal distance between the bells and sniped the bead string.  Then, after making sure the bead strings were the same length I wired them together between the two ends beads with some thin gold wire I had on hand. Next, came the glitter.  I poured some ModPodge glue into a jar lid, and carefully dipped just the edge of the bell into the glue in a circular motion.  I then poured some light blue glitter into another lid, and dipped the ornament edge in to cover the glue.  I dried the bell upside-down in an old egg carton.  After it was dry, I used a craft paintbrush to apply a line of ModPodge for the second color of glitter (navy blue) on a band around the bell.  This time I just sprinkled the glitter over the wet glue and taped against it to remove the excess.  Let dry again.  As with all glitter projects, do it over a piece of paper or mat so that you can put it back in the jar and reuse it.  Lastly, I made little glitter bows with some glitter ribbon also bought at Dollar Tree.  For these, I didn't actually tie a bow I just made it like you would a cheer bow and wired it with the same fine wire I used to wire the bead strands together.  I used a glue gun to attach the finished bow to the top of the bell.  

Oh! I almost forgot...I used a fine tip Sharpie to write the team name and year on the inside edge of the bell.  Here's some photos to help you understand these rambling directions! They're really very easy, and I think pretty darn cute!  Not bad for less than $5 for 20 including all the materials!


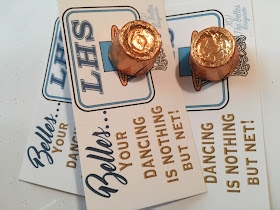
"Halftime" Dance Team Performance Favors

Hi all! It's another rainy Saturday here in Oregon, so I thought I'd catch up a bit with the ol' blog.  If you've read my previous posts, you'll see lots of little favors I've made for my girls dance team when they perform, compete or party.  

Here's a group of three different favors, all using the same format of using a business card template in my PrintShop for Mac program.  The first and second favors were a play on the lyrics from the song they performed to..."I can move mountains" and "I can work a miracle." So, a cool mountain graphic and some Disney Frozen fruit snacks; favor one, done.  Second, some cloud graphics to play on the etherial miracle idea and a little Rolo candy.  Lastly, some favors I made for a recent basketball halftime performance. Nothing expensive here, just a little "shot" of chocolate to put some jump in their steps! As always, I hope these inspire you to spoil your favorite team with sweet kindness.


Thursday, November 3, 2016

Dollar Store Tablecloth DIY....Transformed to a Grass Skirt or Tutu Costume

I know it's a few days past Halloween, but you may still have costume parties to attend or maybe it's a school spirit week you need to dress up for...and if you need a cheap last-minute costume? I've got you covered!  Both my daughter's needed skirts for their costumes this year, and this brainstorm of mine worked perfectly. It's amazing the things that come to you when you're wandering the aisles of a Dollar Tree store! One daughter needed a grass skirt to be Lilo, the other a pink tutu for her unicorn costume. I've made tulle versions in the past, but that can add up quickly in time and cost.  In this case, all you need is a piece of waistband elastic (ribbon would work too, just keep it long enough to tie into a bow), couple safety pins and two plastic Dollar Store tablecloths.  It took only an hour to complete both skirts.

Step One:  Unfold the tablecloth only partially.  It comes folded in the package, and you'll just want to unfold it horizontally leaving it folded in fourths lengthwise. (This will make sense when it's in front of you!) In other words, it will be opened lengthwise with the fold along the center still in place, and then folded again.

Step Two:  Cut perpendicular to the fold.  I used a 3-1/2" wide quilting ruler and a cutting mat, but any will do. I also used a rotary cutter which made it super speedy and neat, but scissors would work fine too.  Just kept cutting 3-1/2" strips until you've reached to end!  Of course, you may want your strips wider or narrower based on your preference and that's fine too!

Step Three:  Pin your elastic into a circle.  Stretch your elastic over the back of a chair to act as a second pair of hands.  Now you're ready to start attaching the strips of plastic.

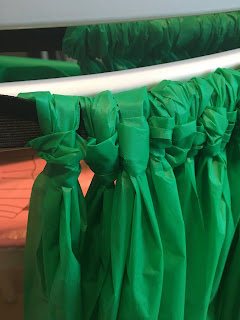
Step Four:  Unfold strips.  At the middle of the strip, drape it over your hand. Then, with the elastic in front of the strip, grab the plastic from the other side and pull through the loop you've made. (See photos.)

Step Five:  Adjust the knotted plastic carefully, as it will show over-stretching. Just work is gently.


Step Six:  Continue around the elastic until all the strips from both tablecloths are attached.  Now depending on your waist size, you may need more or less of the strips to get the fullness you desire.

Step Seven:  I made two skirts, one for each daughter in different colors, and one wanted it shorter.  Just cut to length with scissors while it's on the person who'll be wearing it or mark with a marker, and remove the skirt and cut.


My girls! All decked out for their Halloween fun!
Note: The hula headpiece and arm/leg bands were made from Dollar Store felt.
I just cut leaf and strip shapes, folded them for a lifelike appearance, layered and tacked them
to green ribbon with my sewing machine.


Monday, October 31, 2016

Dance Team Competition Centerpiece


As promised, here's post two for today! This one is for a much more complex project, and while I know you won't be replicating it exactly I want to be specific about my process.  

So for a little background, as team mom I had been using the same centerpiece for the past three years for when the team would travel to their roughly 7 competitions a year.  As you can see in the picture, it was easy to assemble and transport. Basically, it was a sign I made on the computer, glittered and laminated.  Then I used a table number holder to prop it up inside a blue bucket (from Dollar Tree) and surround it with fan poms, bows and glittered bells.  As the years went on, I added to it with glittered "LHS" letters and some battery-operated lights (not pictured).  


But this year, I was in the mood for something new and more professional looking.  I searched the web for all kinds of different signs, banners, and sign stands but nothing was matching what I was picturing in my head, and many were very expensive.  So, I took a trip to Home Depot and bought some 1/4" MDF sheets for around $3.75 each and got to work.  Here's the breakdown of my process in pictures, and be sure to comment with any questions you might have if you are feeling brave enough to tackle a big project like this.  This is definitely for the more advanced crafter simply because of the use of the Cricut to create the pattern, a jig saw, and a miter box.  Of course, you may want to enlist the help of a woodworker in your family to make the cuts just to be safe.


Step One: I created a pattern on the Cricut in four pieces then reassembled the image with tape. (There's a great
YouTube tutorial on making large images that you should watch for this technique!)  Be sure
to arrange your letters individually so that there are plenty of contact points with the outer circle
for added stability.  The circle is roughly 24" in diameter.

Step Two:  Trace around your template with a pencil.  I used some weights to hold it in place while tracing.

Step Three:  Put on your safety glasses!  To begin the cutting process, you must first drill pilot holes large enough in diameter to slide the jig saw blade into.  Drill into each section that will be cut away.

Step Four:  Begin cutting away the smallest portions of the design first to keep the project as stable as possible.  The
jig saw blade is the thinnest I could find and was intended for laminate, making it possible to make the turns.  Work
slowly, and stop the saw and reposition often to get the correct shapes.

Step Five:  Continue cutting the sections out, making sure to leave the attachment points to the outer circle in place.


Step Five:  Cuts are complete, and lightly sand any rough edges.  Be very careful not to push
too hard while doing this because MDF can snap!  You can see I used an old crate as my work space
because the cut pieces could just fall through.  Just be careful to be on a very sturdy base.

Be prepared for a dusty mess to clean up!  A dust mask isn't bad idea in addition to the safety glasses!

Step Six:  Begin painting.  I didn't prime my project because the MDF is so nice and smooth, but you may
want to.  I simply used acrylic craft paint in school colors and a foam brush (small art brushes come
in handy for the tight corners!) Paint one side at a time, and allow ample drying time before flipping.
Tip:  I used inverted small paper cups to hold the project up.

Step Seven:  After allowing the first color to dry, I painted the second color around the edge.  You might
be able to tell I wasn't too concerned with imperfections because it's not going to show once I
glitter the whole sign.

Step Eight:  Glitter!  Brushing the interior and exterior edges in sections with ModPodge, I then
rolled it through the glitter on some scrap paper.  For the interior edge, you just sort of pour it over
the glue and tap off the excess.  The glitter that drops can just be funneled back into it's container.

Step Nine:  Glittering the interior letters.  Same process as above...just brush on ModPodge in sections,
pour glitter, shake off excess and move to the next section.

Step Ten:  After drying, coat the glittered areas with another layer of ModPodge to be sure it adheres.  This does
reduce the sparkle just a little, but you don't want it all falling off so you have to do it!  Once dry, flip the sign
over and repeat the process.

Completed Sign..Glitter Everywhere!  Just a little side note, I couldn't find navy glitter so I just
mixed royal blue and black glitter.  It worked like a charm!

Step 11:  Building the box base.  Two more sheets of 1/4" MDF, cut to the size I wanted by the Home Depot
guy on their panel saw to save me time.  The box dimensions are 14" wide x 10" high x 6" deep.  I glued the
box together with wood glue.  Once dry, I nailed some small nails into the corners.  The trim pieces are just
paint stir sticks!  They are a fraction of the cost of buying linear feet of trim, and 11 long sticks where just the right amount.
The curved molding at the base of the box was attached first, and was something I had in the barn.  But, I know
they've got lots of similar trim at the store.  I cut it to size using a miter saw and miter box.

Step 12:  My brother's a carpenter, so I had him use his pinner gun to give extra security to the joints
of the box even though the glue is really strong.

Step 13:  I painted the box in coordinating colors to the circular sign, and of course, added glitter in the same
method described above. I left the center of the panels un-glittered so that the light blue letters would stand out more.
 The "Liberty" varsity style letters and Liberty Bells of the ends were cut on the Cricut from heavy glittered
card stock and glued with very strong craft glue (E6000).  The circular sign is held up inside by a two scrap
pieces of MDF with slits cut in the middle for the sign arm to slide through.  There are spacers attached
to those to spread the support up the arm.  A side note, the sign's arm was lengthened by sandwiching longer
pieces of MDF to each side of the original arm (along with an extension piece, making it three layers thick for stability).  The interior of the box and all the supports were painted dark navy.  I then found
two battery operated LED light bars at the hardware store to cast light up on to the sign.  Lastly,
I added a glittery tulle bow to finish it off, since I didn't want to block the light with anything solid.

After all that...I had some extra curved pieces of MDF left over, so I painted them in navy and glittered the edges in gold.  I attached some velcro to the base, and to the old gold glitter letters I had, and now I can use them on additional tables when necessary.  It all ties together nicely, I think.  I hope this post has inspired you to create a team sign for your favorite team.  Just be sure to be safe while using power tools... and let your team spirit shine!


Team Pumpkin Patch Trip Favors

Happy Monday! I've got a few posts to share today, the first being a super simple favor I made on the Cricut for my daughters' trip to the pumpkin patch with their dance team.  A Liberty Bell silhouette, simple wording and a caramel apple sucker is all you need. Oh, and a hot glue gun to affix the label to the sucker.  Here's the pics for inspiration!  And, stay tuned for a big project I've been working on...